Saturday, February 21, 2015

Painting Tips for Nest and Egg Art

It is so time to paint something Spring!


Pin It!


I'm always ready for warm spring reminders on my wall

so I start painting those hopeful signs now.


You can too!

Any wood or canvas surface will do.

This nest art is 22" x 22".

Start with a brown wash

and

White over top leaving an 11" circle.


Here are the colors for the golden nest:


The center brown is a mix of black and chocolate bar.


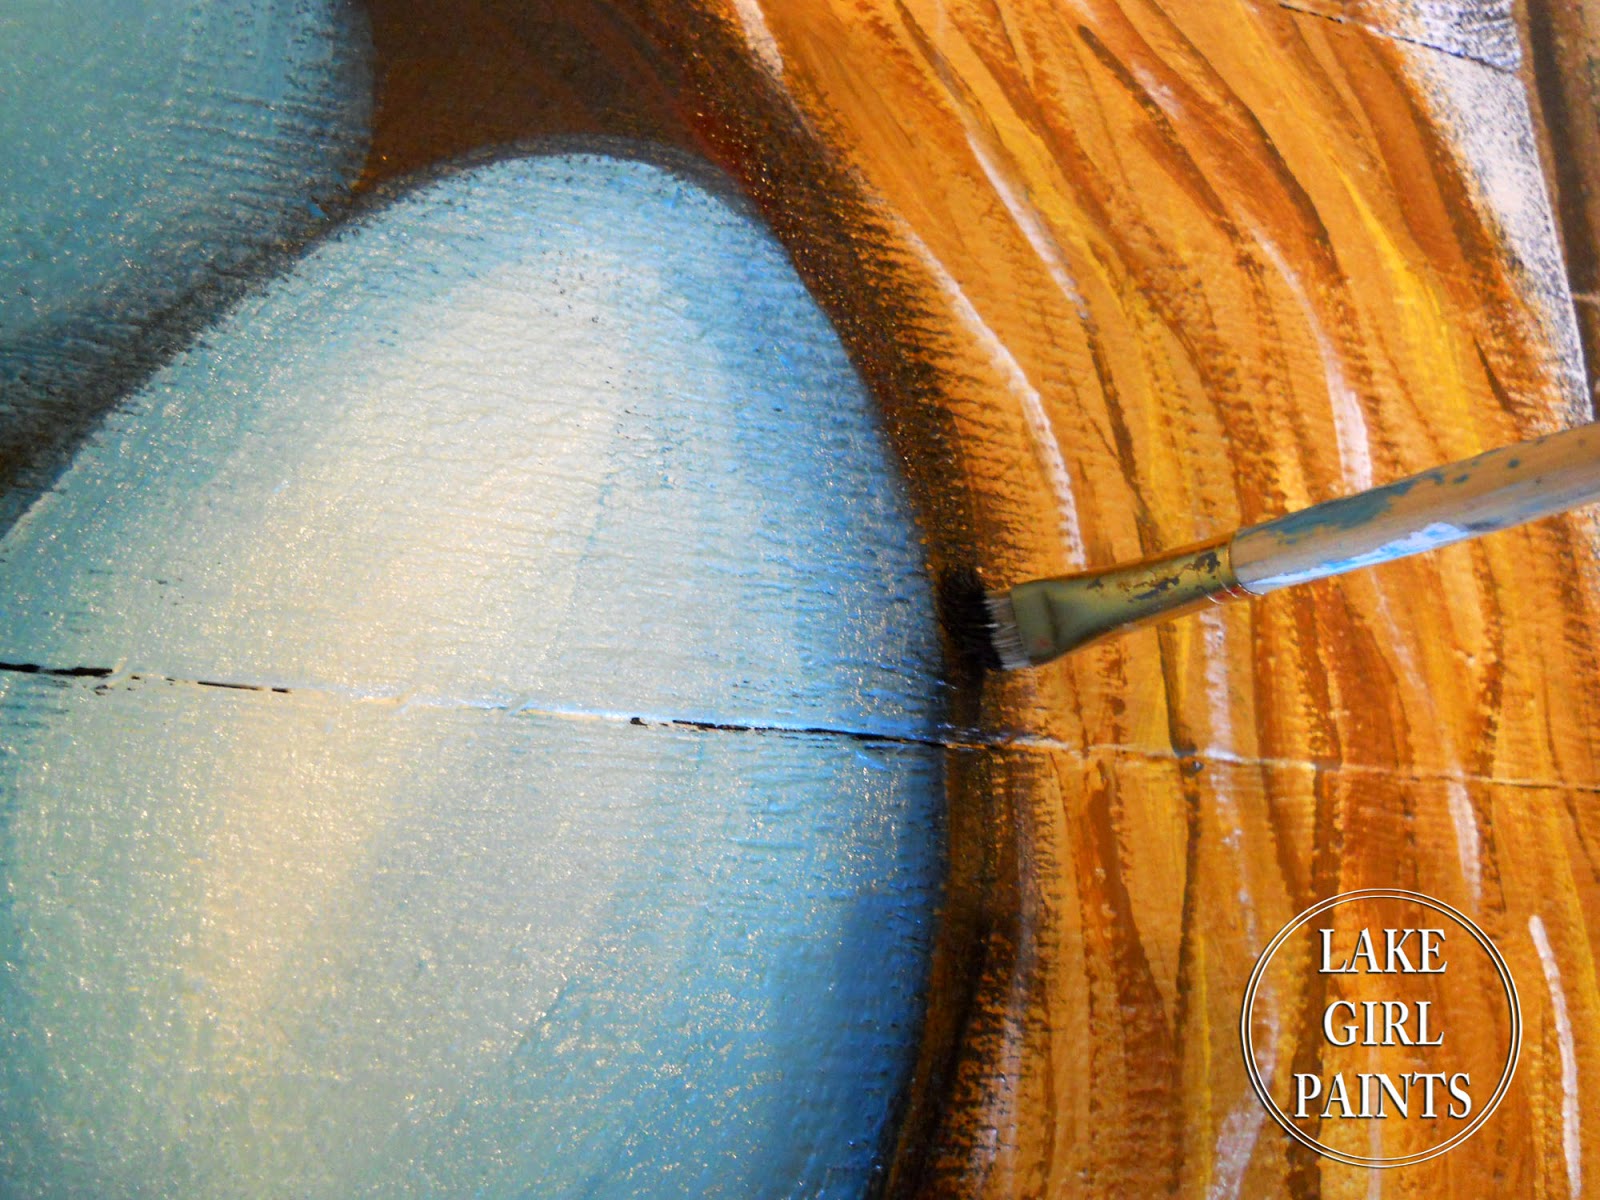
Alternate yellows and pull a flat brush

around the nest in a wave motion.


Then use a smaller round brush and do the same.

Then again with a fine liner and add some white.


Make an egg template, trace with chalk,

and fill in with white primer.


Shade with turquoise and aqua

giving a good white highlight.


Shade inner circle with brown.


Pin It!


Ashley's large brown egg painting in her book "Handmade Walls"

got me started!  

Though there is not paint instruction for this project,

there are so many other great frame ideas!


You know you want some happy spring art too!

Hope you get your brushes out : )

This helps me get through winter and look forward to Spring.

Two years ago at this time

I made some other Spring Art 

that you might want to try.


This could be a great project this February Weekend,

Deb


Sharing At:


Pin It!


Saturday, February 14, 2015

Large Chalkboard with Striped Frame - DIY

Like a giant sketch pad,

a large chalkboard is a place to play

with fonts, sayings, and designs.


Pin It!
I used to have a whole chalkboard wall to write on.

I haven't done that in my new home

so I thought I would make a large chalkboard 

that I can have fun with.


This Chalkboard measures 36" x 48"

and is made with a 1/4" utility panel from Lowes

and 1 x 6 x 6 cedar fence boards.


Pin It!

A 4' x 8' utility panel sheet from Lowes is about $14.

6' cedar fence boards are about 2.50 each.

I mitered the corners and used 3/4" screws to attach

from the back.


Fence boards are very inconsistent to work with

because they vary in width and they shrink

after paint or stain.

So, Wood filler to the rescue if you have any gaps.


Even after a frame is built, the fence board

can try to twist so I sometimes have to

attach a board across the back to stabilize.


I used about 3 coats of chalkboard paint

and 2 coats of white primer.

Next I laid out the diagonal stripes,

measuring equal distant from the corner 

to mark the first line.


I started out using a black and white mix 

on my stripes

but ended up tweaking that color with 

raw sienna to make a light brown gray.


I had seen this quote and decided to use that for now.

I marked out the spacing for the text

and then used a yardstick across the board

for a straight edge guide while writing.


A damp black t shirt rag

 makes a great clean up tool and eraser.


Good Reminders


It was fun to make a creative board for my home.

It will be a great play place.

Hope you're having a great weekend,

Deb


Sharing At:
Pin It!                                                                    The Makers


Saturday, February 7, 2015

Dining Table - Peeks of Wood Grain through Paint

Welcome to a new fun paint project!

For anyone who loves wood grain

but wants to update your furniture with paint,

here is an idea -

Mix paint and stain to create a transparent

layer over wood.


The stripe paint technique on top

has the feel of rustic barn wood

using grays, browns, black, and white.

Hilarie's dining set had great lines to begin with
Pin It!
but needed some repair.


I did strip the table top down to it's natural wood.

That way there wouldn't be any blotches popping up

marking the area of repair.

After sanding and cleaning

I used a long straight edge to guide my brush

applying different combinations on the stripes.


When I used stain with paint,

I dipped one side in paint and one side in stain

and then brushed on.

I didn't use any paints on their own.

I added floetrol to them so they would extend

and appear more transparent.

This is how the top appeared 

after the paint and stain application.

Kind of dull, blended and without a lot of separation.


Adding polyurethane really defined the colors and lines.


I like to fold a foam piece,

dip it in mineral spirits,

then in polyurethane,

and wipe on.

Use long straight pulls.

I applied 3 coats.

So that process took a few days.


I did a white sanded edge finish on the table drop and legs

and added gray to the table top edge.

This is the same gray I used on the chairs.

I did blend a bit of black with the gray for the chairs

so there would appear to be layers of color there too.

I also sanded all of the edges for a worn look on the chairs.

(makes life easier with two little boys in their house)


Hilarie has a lot of beautiful grays in her home

so this will be a nice addition.


So I'm really liking all of the neutral tones 

plus the darker gray chairs

and then the pop of white that sets it off.

So glad to have you visit,

Deb


Pin It!
Sharing At: