Jute Love Again!
My last post was about rope and texture.
I must be on a roll.
Puttin' it on a spool today.
I wanted one of these at Decor Steals.
So cute, right?
I have all of the scrap wood
so I decided to make one!
I cut my circle base 5 1/4" diamenter.
I cut my 1/2" dowel 5 1/4".
Drill a hole in the base with a spade bit.
Wood glue and fill to secure all pieces.
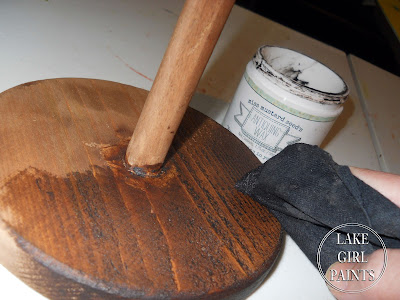
Base with a wash of Burnt Umber and water.
Rub on Black Wax.
If you don't have wax, just make a black wash.
I added some more black paint in random places.
Then wiped off a little bit so it looks worn.
Spray with Gloss Sealer.
That will really add depth of color.
Tie on and start your wrap around!
20 minutes later, you have this!
Now that's a storage solution
that doubles as nice design.
I'm loving the rustic style
that was little or no cost
and about one hour to make!
Hope you enjoy it too,
Deb
Link Parties:


23 comments:
That is so awesome. It looks better than your inspiration piece! Good job Deb!
Wow, this is so awesome!
I so wanted one of these from Decor Steals, but I missed out on it. Your's is the perfect match.
Thanks for sharing your tutorial.
Sandi
I love that black wax!! What a great effect. Cute project!!
I remember this from Decor Steals! Yours is so neat! Looks wonderful! :)
Lake Girl, great minds must certainly think alike! Making one of my own was the first thing I thought of when I saw the deal too!
http://www.homeroad.net/2013/02/diy-string-cone.html
Great job!
Susan
Oh. So. Cute! Thanks for sharing how you made this wonderful twine holder. Even if a person doesn't have many wood working tools (like me) most of these items could be purchased in the wood section of a craft store don't you think? Great tips on getting a time-worn look on wood. I saw your post over at Stone Gable blog party.
Deb,
I'm just loving this jute string holder, dear one!!!
I'm on a hunt for similar object to use. Also, will be searching on my next visit to our local Antique Shops and Flea Markets!!! Thank you for sharing!!!
Fondly,
Pat
Fantastic idea! Thank you for the inspiration :-)
You’re kidding me? When I clicked on this from Shabbilicious Friday Link Party, I was sure I wasn going to hear all about this antique gadget! I can't believe you mad this! LOVE it!
Karen
Thank you for sharing this awesome project. I love it!
Fantastic work, looks great.
Thanks for sharing.
Michele
Looks awesome Deb! You are the queen of turning wood into something fabulous. I bow to your amazing skills!
Debbie
What a great job! Love this!
That's awesome!! What a great idea. I love it ;)
Jamie ~ Better With Age
This is such a great idea and adorable! I think I will be adding this to my project this, though I might try to figure out if there is a way to make part of it rotate so it is easier to unwrap the twine off during a project.
What a great idea Maggie!
Wow!!!! That's and exact match! So adorable. I am going to make one too.
Great idea, Maggie. I like the addition of black paint - really gives it some age.
I hope you'll drop by to see My Daughter's Master Bath Redo - #83 at Met Monday.
Allison
Atticmag
I just can't help myself.... You are a STAR today over at I Gotta Create! I'm featuring you and your fabulous spool. http://igottacreate.blogspot.com/2013/02/12-funky-and-elegant-projects.html
Thank you so much for linking up at the Wildly Original link party!
See you soon,
<3 Christina @ I Gotta Create!
I love this! Saw it featured at I Gotta Create. Will definitely make this! Thanks for the instructions.
this is a great idea! love how it turned out. Thanks for sharing & linking up @ DearCreatives.com Hope your having a great week!
Wow! I love your DIY version! I did see those on Decor Steals. Beautiful job!
I LOVE this! I'm always looking for ways to make storage look pretty so I can keep heavily used items within handy reach & this one tops the charts. Thanks so much for sharing!
Post a Comment