Friday, August 23, 2013

Generations Cedar Chest - Painted and Stained

When it's been in the family
 
for generations,
 
furniture becomes sentimental.
 
Sometimes there are pieces
 
that you know you need to keep
 
and even want to keep,
 
but they are just a little worn and dated
 
and need a "pick-me-up".


Pin It!


Grandma Pat Hemje
 
received this Lane Cedar Chest
 
when she was 16.
 
Now it has a home with her son's family.


So we decided it should bear the family name.


The body of the chest was painted white with camel shade.


The lid was stripped and stained,
 
first applying wood conditioner,
 
then Early American Minwax
 
with black paint on the edges.


Pin It!
 
For the sealer, I used semi-gloss polyurethane
 
mixed with just a tiny bit of paint thinner.
 
Cut a square of foam,
 
fold in half,
 
dip in poly mix,
 
and brush on full stroke
 
with the grain.


Beautiful.
 
No streaks.


Then for the stamp,
 
I worked the design in Photoshop,
 
flipped the text,
 
and printed on paper
 
so that I could do a mod podge transfer.


I should have used gray instead of black.
 
Because after application I decided to go for a softer look.
 
That's okay - I just painted over the transfer.


Then using a liner brush,
 
painted in the text
 
and dry brushed over in cream.


Pin It!
 
The simple design
 
makes it a piece of furniture
 
that can live in any room.
 
So maybe you have something that is a little drab
 
and needs a "pick-me-up".
 
It's so fun what a little paint and stain can do!
 
I paint everyday
 
and still never get tired of seeing fun paint changes!
 
Deb
 
 
Sharing at:


Sunday, August 18, 2013

Old Entertainment Center gets Beadboard Trendy Makeover


Hi! my painting friends,
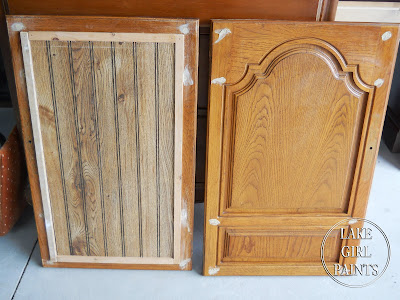
I can't wait to show you what happened to this:


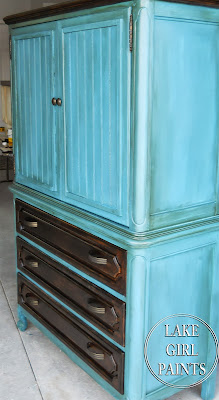
This!


Pin It!

I know.

You have to see it again -

The 1980's went trendy 2013 style.


Cutting off wood flourishes,


refacing the door fronts,


replacing the old backing with beadboard panel,


and adding new hardware.

It was a group effort to transform this old cabinet

into a pantry that Scott and Rachel can use

in their kitchen.

We had to spray prime the entire piece

to rid of any leftover 1980s.


The primer would not have been necessary otherwise.

Smells good now.

We mixed "Peacock Blue" with some black and white

to get our base color.


Now for some rustic charm.

Double load a wide brush with

your base blue and Minwax "Early American" stain.


Occasionally, you might need to add some

clear glaze to your brush to extend and blend.

It really depends on how blended

you want your finish to be.

Less glaze - more line separation.

More glaze - more blending.

After that is dry

use a chip brush dipped in stain

and brush into corners and edges

where you want a worn look.

If it gets too heavy,

just use some paint thinner on a rag

and wipe some off.


We used a wood stripper on the drawers

and applied a new finish -

brushing on both "Early American" stain

and black semi-gloss paint.


Old entertainment centers make great storage.


Pin It!
So this heavy Thomasville

got rid of its curls and swirls

and now has straight line beadboard fashion

with fun color expression.

Hope you all enjoy the before and after!

Deb


Linking to:


Wednesday, August 14, 2013

Mason Jars and Wine Bottles - Burlap and Glitter

Burlap and Twine,
 
Mason Jars and Wine Bottles,
 
Raffia and Yarn,
 
Tea stained book pages and Lace,
 
Glitter and Ribbon...
 
These are the makings
 
for an eclectic mix of decorations
 
at our big country barn dance.
 
 
Pin It!


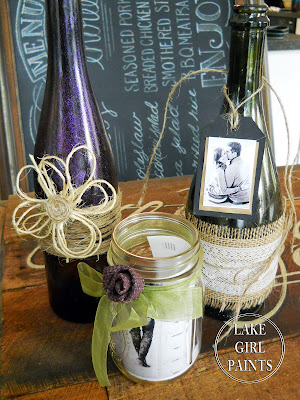
They were a fun mix of wedding centerpieces.
 
Inexpensive.
 
Rustic.
 
Meaningful.
 
Photos inside of mason jars and photos on paper tags
 
kept the groupings personal.
 
Generational photos of Grandparent's weddings
 
were included along with the newlyweds.


We found an old
 

"Emily Post Etiquette" book at the thrift store,


tore out pages,


tea-stained them,


and layered them on burlap


around the wine bottles.


(lots of good laughs with all of the old rules)


Pin It!
 
To add some sparkle,
 
we used glitter in wine bottles
 
and mason jars.


This was quick and easy:
 
Use Pledge Floor Gloss.
 
Squirt in bottle.
 
Roll around until all interior glass is covered.
 
Sprinkle in glitter and roll until you have full coverage.


Pin It!
 
Yarn texture, tissue poms, raffia, and lace
 
were other wraps and accents in the mix.


Green glass paint.


Painted Burlap Purple for flowers.


Pin It!
 
We had so much fun
 
creating different looks.
 
Imagine how many different combinations
 
you can make -
 
and really for any special occasion.
 
I especially loved
 
the personal and family sentiment throughout
 
"our big country barn dance".
 
Enjoying life's celebrations!
 
Deb


Link Parties: