Wednesday, February 27, 2013

You Can Paint on Vinyl

You gotta love paint.
Really, is there any surface that you can't paint on?
I have been painting vinyl chairs for years
and have had good experience with durability and wear.
I thought I would share one of my recent projects.

Pin It!

This was an old chair that my friend had

that was needing some College Spirit.

I painted the wood part of the chair Red over Black

like I have done in other paint projects.

Then I found some black Vinyl for under $4/yard.

The seat needed a new layer of batting.

I have more details on padding a chair seat Here.

I found the college logo online,

chalked up the back,

placed on center of chair seat, and

pressed the outline with a pencil.

I taped off the square edges

and brushed on a coat of white primer.


Then painted in the rest of the detail.

After I had the logo painted I put a coat of clear glaze on top.

You can even add some glaze to your paints as you work.


Here's another chair where I painted entirely over all of the vinyl.

After a base coat of grey,

I used a big brush to apply silver and black mixed with glaze.

The glaze is a medium that will make your paint

flexible and not so stiff.

Also, the glaze helps seal the paint.

Then I added finer brush detail.


So now when you're out thrifting

you can have a new vision for vinyl.


Pin It!

I love to go thrifting

to see what little goodies

are waiting

for the "old college try".

Have a great day!


*I have had really good luck with my paint on vinyl
not chipping or peeling.  I think it is because of the
glaze extender.  It makes the paint more pliable.
My chair after two years still looks great*

Oh, and remember, I'm having a Giveaway this week

to celebrate my first Blog Birthday.


Deb

Link Parties:


Saturday, February 23, 2013

Dining Table -Black to Farmhouse Natural & White

What!
She's removing paint and going natural.
It's fun to change things up for little cost.
Maybe it's because I'm looking for something
lighter and brighter -
You know, a sunny spot.

Pin It!

Oh, though I have such good memories

of my black dining table....


last October?


My table is about 10 years old

and has lots of wear.


No Fear.

There is such great liberty with paint.

It's so easy to change time after time.


After two or three applications of paint remover

I was down to using fine steel wool,

a little bit of paint stripper,

and some paint thinner.

When it was all clean I applied a light coat of stain.


Then I applied Polycrylic sealer with foam.

(You could use a roller)


I painted the legs and trim a creamy white semi-gloss.

I brushed on directly over the black paint,

then sanded the edges.

It gives you that nice rustic worn charm.


For now, I'm leaving the chairs black.

But I might paint them multi-colored

(soft beachy tones).

It's funny how paint has a lot to do with my mood!

But since I have dark floors and dark countertops

I was looking for some light relief in my dining room.

Here you can see the black table from above.


Now the lighter...


Pin It!

Really, I like them both.

I was just ready for a change.

And wait till I get my Spring Centerpiece

and table setting going....

Can't wait to show you.

So do you have a piece of furniture

that's up for a change, just because.

Fresh is Fun!

Deb

Link Parties:


Wednesday, February 20, 2013

Jute Go Round Spool - Knock Off

Jute Love Again!
 
My last post was about rope and texture.
 
I must be on a roll.
 
Puttin' it on a spool today.


Pin It!
 
I wanted one of these at Decor Steals.


So cute, right?
 
I have all of the scrap wood
 
so I decided to make one!


I cut my circle base 5 1/4" diamenter.
 
I cut my 1/2" dowel 5 1/4".
 
Drill a hole in the base with a spade bit.


Wood glue and fill to secure all pieces.
 
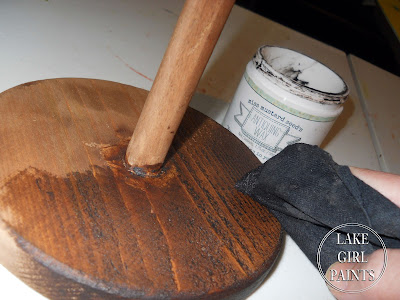
Base with a wash of Burnt Umber and water.


Rub on Black Wax.
 
If you don't have wax, just make a black wash.


I added some more black paint in random places.


Then wiped off a little bit so it looks worn.


Spray with Gloss Sealer.
 
That will really add depth of color.


Tie on and start your wrap around!


20 minutes later, you have this!


Now that's a storage solution
 
that doubles as nice design.


Pin It!
 
 
I'm loving the rustic style
 
that was little or no cost
 
and about one hour to make!
 
Hope you enjoy it too,
 
Deb
 
Link Parties:


Saturday, February 16, 2013

Jute Rope Handles - Easy to Make

If you like texture
 
you probably like rope, twine, and jute
 
like I do.


Here is an easy way to add that texture
 
to a furniture handle or pull.


For this round drawer pull,
 
here are step by step photos
 
of the how to.


You might have to drill two new holes in drawer
 
to lead the rope through.


Tie inside of drawer.
 
Then use a smaller twine or jute to tie around larger jute
 
to keep secure.


Trim the ends.
 
Here is the view from above.


And now your drawer has personality.


Pin It!
 
 
Here are some other rope handles
 
that I made for these beach cabinets:


Pin It!
 
 
You can find the detailed instruction on how to make
 
these rope handles here.
 
 
So keep this in your tool belt of furniture tricks
 
to give your old drawer or door
 
a new twist.
 
Hope you're having a great weekend,
 
Deb
 
Link Parties: