Pages

Wednesday, May 21, 2014

Happy Summer Star Canvas

Summer is almost here!

This canvas door hanging 

celebrates the season.


Pin It!

This is an easy project 

with big graphic impact.


So, using a 16 x 20 inch canvas panel,

mark off 5 horizontal stripes, 4" each.


For the blue,

I mixed grey, blue, and white


Then I used the scraping technique -

using folded cardstock and dipping in the blue mix,

a puddle of grey, and a puddle of brown.


Then pressing down, drag the cardstock

across the stripe.  

It will leave great layer dimension.

Keep layering until you get the look you want.


Then for the white stripe,

I used an off white and Craftsmart Suede

to dip and drag across canvas.


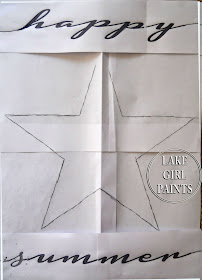
Here is a rough sample of my template:


Base paint the star red.


Dip cardstock in red and black

and drag across star.


Transfer lettering

and paint dark grey.


Pin It!
Now for grommets and ribbon

and 

Your new summer sign is ready!

Really, you could use it for wall art too.


Maybe you can get one ready

for Memorial Weekend!

Happy Painting!

Deb


Sharing At:

Thursday, May 15, 2014

Moving and a New Welcome Sign

I've moved, guys.

My life journey 

has something new for me.


Just so you know

I will always be "lake girl" at heart.

I am excited for my new home and town too.

I'm not sure where that home will be exactly.

We are living in an apartment now.


Of course I had to turn it into a paint studio!


And to make me feel at home,

I decided to make a welcome sign for my door.


Pin It!

And of course I'm going to share the details with you!

You might want one for your door.

I used a 16" x 20" canvas panel.

I'm going for a chalkboard look.

Base paint with a mix of black and off white.


Here is a video to show the brush motion.


Then I designed the layout in photoshop.


To arch the letters for the name in the ribbon

click on this arch button after you write the text.


Here is the template for your use:


Chalk the outline of letters on the back side of paper.

Transfer the chalk with pen pressure from the front.


Detail with white paint and a liner brush.


Add grommets and ribbon.


Pin It!


Black chalkboard or grey - both are fun!


Pin It!

These door hanger welcome signs

are good for any season.

Thanks for reading my blog!

Deb


Sharing At:


Friday, May 9, 2014

Painting on Outdoor Metal - Windmill

Hey Friends!

Today I'm going a little bit country.


Pin It!


Pin It!

My cousin, Ryan, gave me quite the challenge

painting the tail of his windmill.

Thank goodness he bought it unassembled

so I didn't have to go up in a cherry picker lift

to paint it! ha.

Ryan recently purchased his grandparents farm

and is bringing energy and life to the setting

with his newly painted red barn

and now windmill to match.


I needed help from an expert 

in painting outdoor metals,

so I went to Mr Iske, our local industrial arts teacher.

His classes build and paint race cars

and he is savvy about agricultural buildings.

Sooo...

I started by laying my design out in Photoshop.

I took a picture of the tail,


layered it into photoshop

and experimented with different fonts

and lettering arrangements

until we found the right color and design.

This is a photoshop sample:


Here is another one:


Then, 

in real life : )

I started to prep.

Sand with 80 grit sandpaper.

Clean with aerosol solvent "Brakleen".

You can find this at Napa or O'Reilly Auto.

It is used to clean brake systems.

Let dry completely.

Next, I made a stencil with cardstock and packaging tape

and sprayed a primer onto the metal,

using 616 Cold Galvanizing Primer.


That takes a good 24 hours to dry.

Brush on Van Sickle brand paint.

No sealer needed.


Pin It!


Allow at least 8 hour drying time between coats.

Yep, it's a marathon project.

It was the centerpiece of my living room

for about a week.


I love that Ryan wanted to pay tribute

to his grandparents 

with their names and date established.

What a blessing to the Hrdlicka family.


I know - 

not my typical paint project.

Now let's see how it weathers!

I figure if they use this paint on tractors

we should be good to go.

Thanks so much for stopping by!

Deb


Sharing At: