Hey friends!
Summer is here.
My favorite time of year.
So to celebrate,
today I'm making a Flag bunting.
I knew I had to make one
the other day when I received
this email from Pottery Barn.
So festive and summery!
So here are the details
on how to "get the look".
Cut 2 pieces of yard canvas 12" x 36".
(canvas purchased by the yard on a bolt)
(two pieces makes it easier to manage
but if you don't want to stitch seams later,
cut one long piece 12" x 72")
Press.
Mark with chalk every 2".
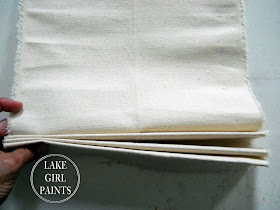
Fold 2" accordion pleats
the entire length of the canvas.
Cut one end at an angle.
Using a 1/2" guide,
pencil in a chevron pattern
near the cut edge.
You can use tape
or just paint along the pencil lines
using navy blue.
Mark the other stripe placement
and paint.
Use a cloth over top of paint
and heat set with the iron.
Mix instant tea with water
and brush on entire canvas.
I top stitched some of the stripes.
Then fold and press.
Stitch the two pieces
right sides together.
Hot glue each pleat near center.
Hand stitch on back.
Put hot glue in the center.
Add grommet.
Now you have patriotic wall art!
In this picture I have it hanging
on the Barnwood Backdrop.
It would be fun to have
different patterns and sizes
to hang in a group.
I hope your summer is off to a great start,
Deb
Link Parties:


You thought of every last detail Deb! It looks almost exactly like the original, but I like yours better because it's hand made. It also has your particular style of painting, which I'm beginning to be able to recognize. :) I could see this idea being used in so many ways for so many seasons. And I love it on that Barnwood Backdrop (still one of my favorite projects of yours). Well done!
ReplyDeleteDebbie
Absolutely fabulous Deb! What a great piece for the summer too!
ReplyDeleteGreat job....It's as nice as the Pottery Barn version! Love that you used the gromet to hang it, too....Very professional detail!
ReplyDeleteJamie | andersonandgrant.blogspot.com
So fantastic--I was thinking of making one yesterday out of paper for my front door. Decided the paper was too flimsy so made a wood star instead. Love the canvas for a much more permanent one! Going to share on Facebook!
ReplyDeleteAnother fantastic project! Love the bunting. And your creativity.
ReplyDeleteJudy
Adorable with a capital "A"...! Love it!
ReplyDeleteSuper cute! I love that you see something and figure out a way to replicate it :) Thank for the tutorial!
ReplyDeleteLove this!! You're so creative!! Thanks for sharing!!:)
ReplyDeleteWhat a lovely project. Your tutorial was absolutely perfect. Can't wait to try this.
ReplyDeleteThanks for sharing,
Have a wonderful weekend,
Bev
@ Eclectic Red Barn
I saw these and pinned them. I was going to pull out my 4th decorations this morning. Thanks for the tutorial and reminder!
ReplyDeleteI love how this turned out! Pinning!
ReplyDeleteRitchil
http://chengand3kids.blogspot.com/
Totally cute!! Even better than the original!
ReplyDeleteThanks for figuring it all out and sharing it with us.
ReplyDeleteI love the awesome vintage feel Deb!
ReplyDeleteThis is fabulous. Thanks for sharing an easy to follow tutorial for such a great piece!
ReplyDeleteWhat a cute patriotic bunting! Love it.
ReplyDeleteKC
I love these! I saw them in the store awhile back and wondered how they were able to get the burlap so stiff. I hope I have time to make some using your tutorial before the 4th, if not, I'll be pinning it for next year! Thanks for sharing!
ReplyDeleteCheck you out!!! You rock!!
ReplyDeletePottery Barn ain't got nothing on you :)
Have a blessed and wonderful day!!
This is awesome! I saw them hanging in my local PB and thought about trying to replicate. Now I'll have your instructions if I do! It looks great! Thanks for sharing. |Kristen
ReplyDeletewow, I love this! you did a great job putting this together, I'm featuring this post today at Be Inspired! thanks for joining in!
ReplyDeleteOh wow, I love this! I saw that pic in PB and drooled, but did I think of trying to make one? That would be a big fat, NO! Hopped over from Common Ground. Now a new follower. I have a link party, Share Your Cup Thursday. It's all about sharing what makes you happy. Would love if you shared.
ReplyDeletehugs,
Jann
Amazing! I love this! Wow! And, you did a fantastic tutorial!
ReplyDeleteDeb,
ReplyDeleteThis is such a cute idea...so happy that I came by to see how you made it. Thanks so much for sharing with us how you made it step by step.
Blessings,
Linda
Would love for you to share this creative project at SImple & Sweet Fridays! Love the tutorial, great job!
ReplyDeleteTake Care,
Jody
I saw this on a 4th of July roundup and just had to pin it. I hope you’ll share your best post of the week on my Friday Flash Blog Linky Party going on ALL weekend at The Jenny Evolution.
ReplyDeleteJennifer
thejennyevolution.com
Deb, I love this and you did a fabulous job! Thanks for sharing your project at the Open House party and check out tonight's party for your feature.
ReplyDeletexx,
Sherry
Hi Deb, just hopping by to let you know that I will be featuring you at Share Your Cup tonight.
ReplyDeletehugs,
Jann
So cute~ I love it! Thanks for linking up at Feathered Nest Friday!
ReplyDeleteThank you, thank you, thank you! This is just so much fun, can't wait to get started on one.
ReplyDeleteAbsolutely wonderful! I mean really wonderful!! Thank you for providing the well detailed tutorial/description. I'm pinning this. Such a fab idea. Again, many thanks for the lovely inspiration.
ReplyDeleteHow clever you are! It looks great. Have a happy & safe 4th. -Dawn
ReplyDelete