Pages

Thursday, June 20, 2013

Painted Canvas Flag Bunting - Pottery Barn Style

Hey friends!
 
Summer is here.
 
My favorite time of year.
 
So to celebrate,
 
today I'm making a Flag bunting.


Pin It!
 
I knew I had to make one
 
the other day when I received
 
this email from Pottery Barn.


So festive and summery!


So here are the details
 
on how to "get the look".
 
 
Cut 2 pieces of yard canvas 12" x 36".
 
(canvas purchased by the yard on a bolt)
 
(two pieces makes it easier to manage
 
but if you don't want to stitch seams later,
 
cut one long piece 12" x 72")
 
Press.
 
Mark with chalk every 2".


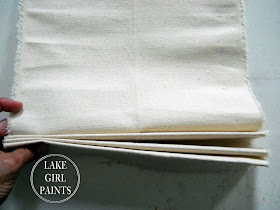
Fold 2" accordion pleats
 
the entire length of the canvas.


Cut one end at an angle.


Using a 1/2" guide,
 
pencil in a chevron pattern
 
near the cut edge.
 
You can use tape
 
or just paint along the pencil lines
 
using navy blue.


Mark the other stripe placement
 
and paint.


Use a cloth over top of paint
 
and heat set with the iron.
 
 
Mix instant tea with water
 
and brush on entire canvas.


I top stitched some of the stripes.


Then fold and press.
 
Stitch the two pieces
 
right sides together.


Hot glue each pleat near center.
 
Hand stitch on back.
 
Put hot glue in the center.


Add grommet.


Now you have patriotic wall art!
 
In this picture I have it hanging


It would be fun to have
 
different patterns and sizes
 
to hang in a group.


Pin It!
 
I hope your summer is off to a great start,
 
Deb


Link Parties:


Friday, June 14, 2013

Layered Paint Style - Red and Aqua

I'm a paint layer.


Pin It!
 
I love to see the way colors blend
 
and lay next to each other.


So I lay them down
 
sometimes one layer at a time
 
and sometimes 2 or 3 colors on one brush.
 
 
Today I'm working on
 
two tables that will live in a lake home.


Layers of paint color gave them new life.
 
 
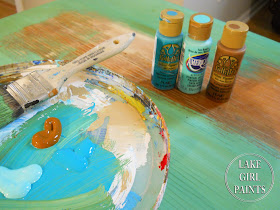
Double loading a large flat brush with
 
white and camel
 
give the legs of the table
 
a creamy old look.


Raw Sienna and Yellow Ochre for the
 
golden brown drop and drawer.


Then I triple loaded my brush
 
dipping in 3 colors,
 
aqua, raw sienna, and sea breeze.
 
Brush back and forth
 
creating color depth and separation.


If you want a more blended look,
 
add glaze.
 
If you want more color separation,
 
just paint.
 
If  you think your brush is running out of paint
 
too quickly, dip your brush in water
 
and then load.
 
For more depth and dimension,
 
dry brush raw sienna and brown in places.


I even dry brushed black on some edges.
 
(dipping in black paint and rubbing it off
 
on a paper towel, then applying)


For the Red and Aqua table,
 
I based in aqua and covered over with red
 
and then added some aqua on top again.


On the lampstand base,
 
I double loaded Dark Aqua and brown
 
for the top coat
 
and let some red base show through.


It's fun to experiment with color combinations.
 
So easy to change.
 
No fear.


Pin It!
 
So fun to see shabby little brown
 
and unused furniture
 
become the life of the party.
 
Hope you're all up to something fun too!
 
Deb


Link Parties:


Friday, June 7, 2013

Topiary Garden Art on Rustic Boards

How could I resist.
 
Garden love + Paint love + Rustic Boards
 
= Topiary Art!


Pin It!
 
There's something about my hands in the soil
 
this time of year.
 
So as I was out planting my new boxwood
 
I found my inspiration
 
for some more rustic art.
 
A few weeks ago I was celebrating nature


This garden group has a lot the same feel-
 
Painted on Fence boards
 
and based with black and rust.


Top coat with a gray, taupe, and white mix.


Add a bit of random camel.


Trace a template for the tall pot
 
and fill in with a mix of toffee, terra cotta,
 
and burnt umber.
 
Dry brush white.


Pounce some Olive Green paint
 
into a circular shape
 
for the rosemary base.


Off load a bit with a wet wipe.


Using a liner brush,
 
paint in long loose stems with
 
simple strokes for leaves...
 
some light and airy ,
 
some heavy with burnt umber.


Keep filling in.


see - not perfect.
 
Random, sketchy, painterly.


Now for the boxwood...
 
Use black and terra cotta for the pot.
 
Camel and raw sienna for the tag.


Olive green for the circle base boxwood


Using a round brush
 
lay in all over strokes for green leaves
 
switching directions.


Off load a bit with a wet wipe to see
 
a lighter layer underneath.


Double load your round brush
 
with white and green
 
and paint in some lighter leaves.
 
Can add some dark shade to bottom right leaves.


Pin It!
 
I liked the idea of a dark piece in the trio,
 
so I stained this board
 
and brushed some black on top.


Fence Board is inexpensive -
 
about $2 for 6'.
 
So this group was $4
 
(plus paint and screws).
 
You could make any mix of
 
shapes and sizes.


Pin It!
 
It's a classic garden mix - pallet board style!
 
I really appreciate your visits to my blog!
 
Hope you find some inspiration here
 
for YOUR Home,
 
Deb


Link Parties: